Happy Wednesday, all! I’m writing to you on my LAST DAY AS A 34-YEAR-OLD. Yup, that’s right. Tomorrow I’m turning 35! I had a minor meltdown a few days ago and my husband reassured me that I’m doing good things in my life and have made positive contributions to the world in many ways – namely, giving birth to and raising our fabulous daughters. So, that made me feel great! The cup of coffee I sipped after that didn’t hurt, either 😜 To celebrate another trip around the sun, I’m geeking out about two of my FAVORITE features of Google Forms –> response validation and go to section based on answer!
I use response validation so often in my classroom, I sometimes forget that it’s not a commonly used feature! So … what is response validation and how does it work?
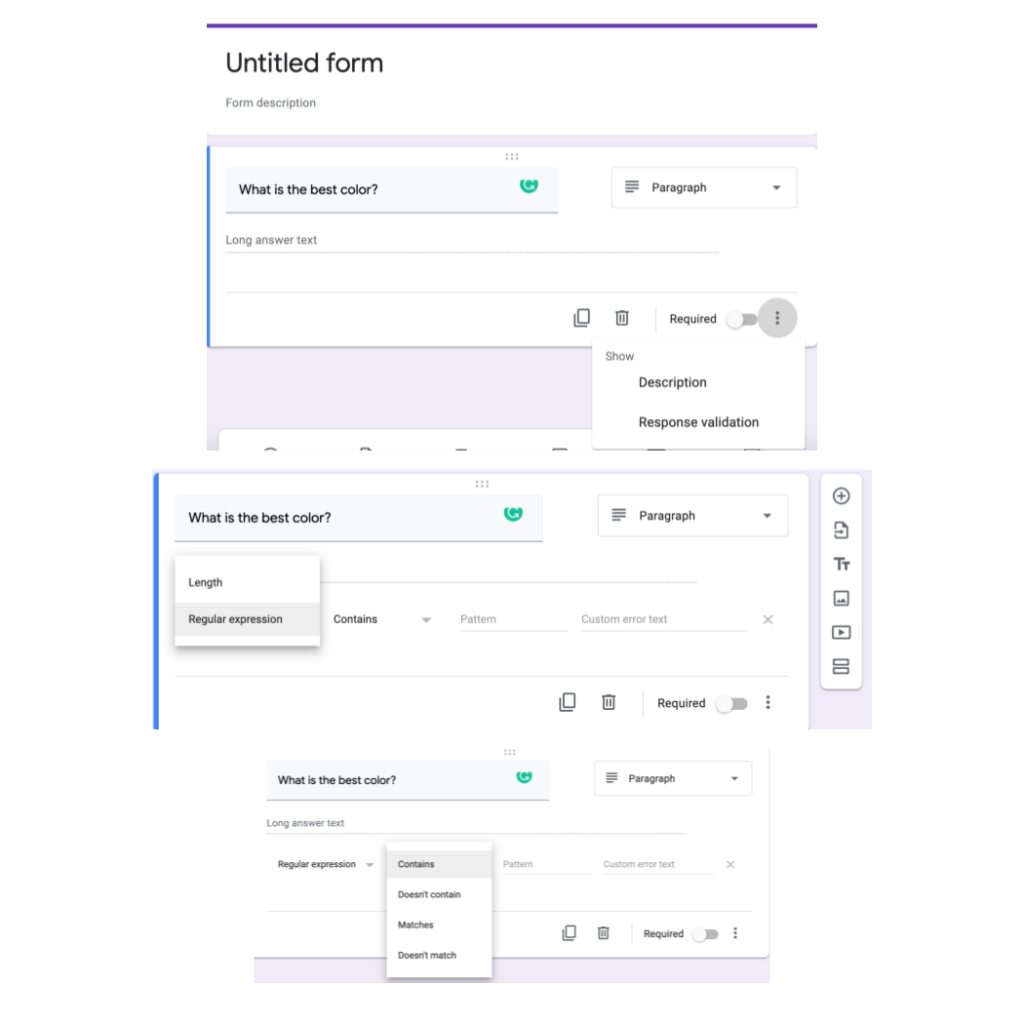
Response validation can be used on a short answer, paragraph, or checkbox question on a Google Form to require the correct response to a question. If someone answers a question incorrectly or gives invalid data (if you ask them to enter a website and they just type random words) on their submission, response validation gives the user a “try again” or “not quite right” (or whatever you choose!) message, prompting them to try again. To use this feature, create your question and then click the “3 little dots” at the bottom of the question. Then, choose response validation. Next, you’ll want to select “regular expression” from the first drop-down menu. Then, you’ll choose what the responses should include or not include in the second drop-down menu. Next, you’ll enter the response you’re looking for and then an error text.
That’s it! Now, users who don’t provide the correct response will be encouraged to “keep trying” until they get it right! This is great for digital BreakoutEDU activities as well as other assignments that you create for students which require them to answer correctly before moving on!
Ok … I know I said this post was #3 in the series and you might think that the post would only include one feature. I can’t help it – I love Google Forms! Very similar in nature to response validation is something I use ALLLLL the time in my classroom – “go to section based on answer!” This feature helps teachers easily create a “choose your own adventure” activity or a branched assignment for their students. Here’s how it works.
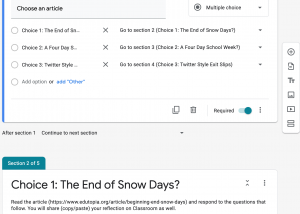
Create a multiple-choice question and include a variety of answer options. Next, I always create a variety of sections that correspond to the response options I provided. Then, you’ll click the “3 little dots” on the bottom of your question box and select “go to section based on answer.” For each response you provide, you’ll notice a drop-down menu appear to the right of the option. Click that menu and select the section to which you’d like to direct your user. Here’s an image for help:
In each of the sections you create, include directions, videos, questions, links, etc., that you want your students to view and interact with. That’s it! I love this feature for so many reasons, but namely because it provides students with CHOICE! I’m a fan of student choice when it comes to learning content – check out Create: Illuminate Student Voice Through Student Choice for tips!
So … how do you use these features in your classroom? I’d love to hear your thoughts!


Leave a Reply